About Lucia Scalisi

I am a formally trained and qualified Conservator of Paintings from a Museum background (Victoria & Albert Museum, London). Conservation is carried out to Museum standards with Continuous Professional Development underscoring practice. I work on large scale Conservation projects abroad as well as training, project development & in television - BBC ‘The Repair Shop’. You can follow me on Instagram:- luciainlondon123

Extra stick📌

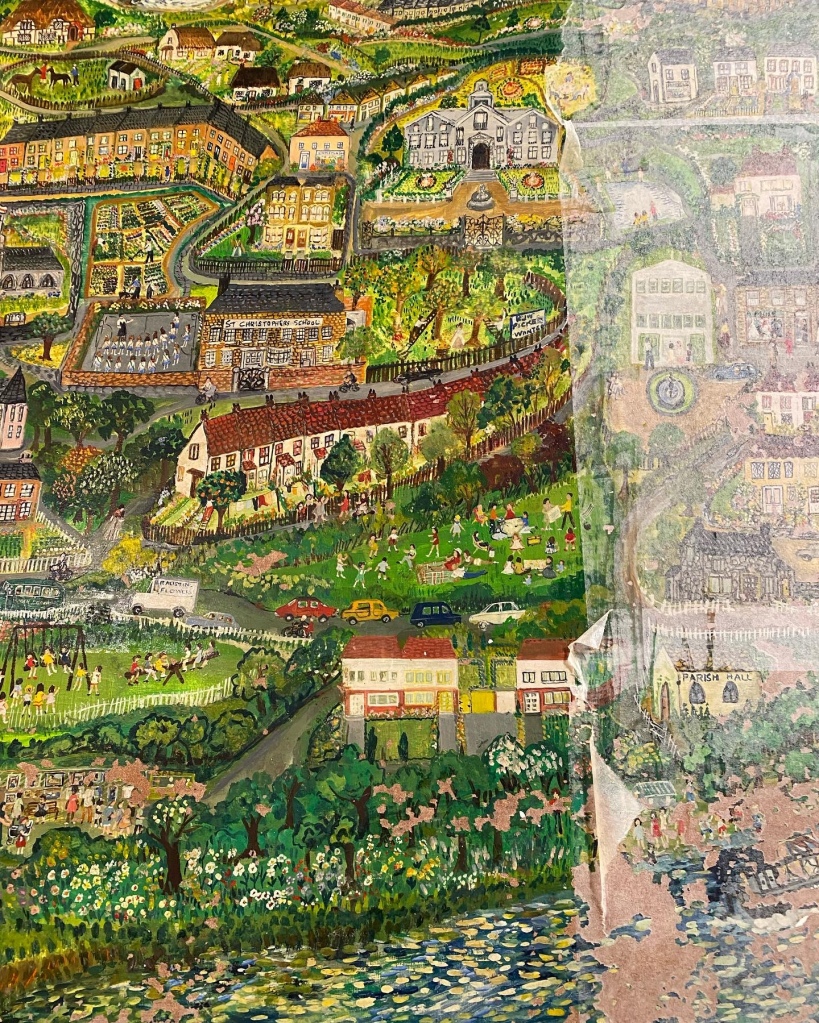
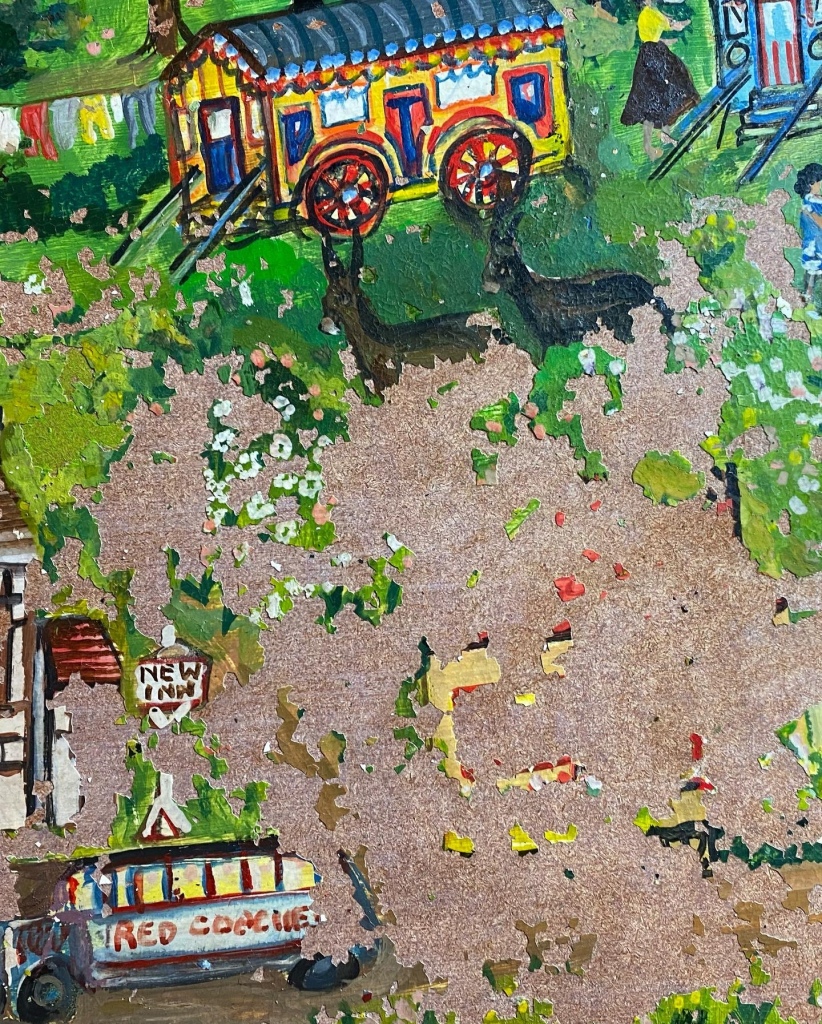
An interesting & challenging painting came in to ‘The Repair Shop’. London born artist Emily Crisp (1912-1974) developed her style as a ‘Primitive’ artist finding great success amongst 60’s era pop culture icons. This particular painting contains many memories of her own family and childhood woven into imaginary landscapes. Technical issues beset the image; Emily painted her intricately observed masterpiece on tempered hardboard. Tempered hardboard is made by impregnating one side with (usually) linseed oil & heating it to high temperatures making it waterproof and smooth. Preparing this as a surface to paint on is not a great choice, but the dimensions and economies made it Emily’s preferred support. Long term issues resulted in extensive flaking paint as the bond between a tempered surface and a water-based paint (likely gouache?) is at best challenging and as we can see it is basically shelling off left, right & centre.

My concerns were how to reattach the paint surface and then how to seal and retouch. In a nutshell I used a ‘heat-seal’ adhesive. There are 3 types of adhesives, you’ll likely know all types, but within each there are many, many, MANY specialities of materials used for sticking things together. If you consider consolidating cave paintings for example, the requirements for an adhesive are to be very different to those required for lunar module tiles or post-it notes or fractured bones. The three types are:-

1. ‘solvent based’ e.g’s pva’s, animal/veg glues & things like water based school glues

2. ‘reaction adhesives’ e.g’s epoxy’s/ superglues

3. melt-freeze adhesives, the simplest of which might be waxes & shellacs.

Adhesives are a vast area of research into materials – this is just a taster, stick with it! ;)))

In this case I used a specific adhesive in the ‘melt freeze’ group – Lascaux 375. Its a thick translucent gel which needs to be heated to flow, allowed to dry i.e. the solvent which enables it to flow and create the required % dilution you need, has to evaporate leaving a dried layer of the material which is ultimately going to make the bond. The dried layer of adhesive is then reheated using my thermostatically controlled lining iron to activate the dried polymer film to create a bond. Technically these materials are superb but you have to know how to use them to – not least – exploit their versatility.

Lascaux 375 used to be called Beva 371 – ‘B’ being Gustave Berger the scientist & conservator who invented it back in the 1970’s, the ‘eva’ (isn’t his wife) is ethylene vinyl acetate a flexible polymer suspended in a solvent….. anyway, it worked brilliantly. It can be manipulated by diluting it to requirements and using heat matched to paint surface tolerances and to make it flow. This isn’t just ‘dip, strip & stick’. Adhesives are multi-billion dollar businesses and research centres, fantastic things are happening in the world of sticking things together.

I LOVED this painting, it was a challenge for me, it was thrilling. I get to use materials and techniques I trained with, in an environment that is remarkable, standing in front of a camera recording every step is …. well, I guess you can guess.

Regarding the retouching, again not without its heartbeat moments. I used acrylics because they have the body to fill the shallow losses and a great intensity of pigment. They’re not so good when it comes to detail work because they’re a bit too thick, can be thinned but then they’re too transparent …. and so on, plenty of manipulation going on.

Acrylics are great because they dry quickly and there’s no colour change on drying or ageing – unlike oils that take forever to dry & change colour once they are dried and continue to change over time becoming more transparent for example, why changes made by the artist – pentimenti – become visible.

The varnish, well another technicality. I love varnishes, they can do lots of things depending on their molecular structure. I chose a high molecular weight synthetic resin called Paraloid B72 because I wanted to add to the surface consolidation – which this material does.

So you see, what you see isn’t what you get – its much, much more & is really exciting!

Removing the facing tissue after consolidation.

Whoops! A bit late …

Catching up/looking out!

It has been a while since I submitted anything to my website & was inspired to do so today. I get a lot of emails through the contact page on this site & I want to let you know that I will always respond – always.

So Mrs Norma Kent, if you’re reading this please do email again because the email you gave isn’t correct. My email to you just boomerangs back.

Please do check your email details.

In the meantime I am very active on Instagram – @luciainlondon123

I like instagram because its a highly visual platform and Conservation is nothing if not picturesque :)))

Do let me know if there is anything in particular you would like me to write about, mostly its Conservation related and materials and techniques of the artist. If you’re an artist and have queries about the materials you use, please ask.

There is such a lot to enjoy in this world of ours and as much as I enjoy working in Conservation here in London one of the larger ‘themes’ of my working life has been working in developing countries. You do not need a lot of expensive technical equipment to run a good practical conservation studio. First and foremost the objects have to be treated with care.

More damage is done through human misintervention than anything else. Most of my work is putting right the work of would be ‘restorers’. Do not make the mistake of thinking that artists can put things right either.

The bottom line is do less.

Maintain the integrity of the object, the artists original intentions, and not your ego to improve it.

If you’re really interested in Conservation then look at the courses that are available both at home and abroad in every discipline you can think of – from natural history to plastic, paintings to sculpture. There is a blog on this website giving listings of some of the training courses in the UK.

Be wary of ‘Restoration’ courses and people who call themselves ‘restorers’ – 90% of the time these people are hobbyists or trade, they do not know their materials and treat everything in their hands in the same way. The ‘dip & strip’ brigade.

Put your items in the hands of such a person at your own risk.

Ask how much training they have how much experience – all the usual questions that cowboy restorers will shy away from. Trained Conservators will be proud to tell you of their practice and actively encourage questions.

In the meantime, if anyone knows Mrs Norma Kent ask her to be in touch ….

Conservation of Fine Art – Training

I am asked quite a lot about training in the Conservation of Paintings and training in Conservation generally. Primarily Conservation is a vocation – you won’t get monetarily wealthy working in this field but you will enrich your life! – I am biased I know, but I think Conservation is a wonderful world and its never too late to discover it.

Here are the 3 main courses for Paintings Conservation in the UK plus one in Conservation Studies – check websites for undergrad and postgrad degrees and Diplomas:-

Conservation of Fine Arts at University of Northumbria – Newcastle

http://www.northumbria.ac.uk

Courtauld Institute of Art

http://www.courtauld.ac.uk

Hamilton Kerr Institute Conservation of Fine Arts – Cambridge

http://www.hki.fitzmuseum.cam.ac.uk

A course in Conservation Studies is on offer at:-

City & Guilds Art School – London

http://www.cityandguildsartschool.ac.uk

I taught for a number of years here and the course is exciting! It doesn’t offer Paintings Conservation but you will learn about paint and pigments and materials and techniques. There are undergrad & postgrad studies. Placements within major institutions are often organised as part of the training. There is a stone carving yard with many students going on to work in stone carving workshops across the UK. Frame conservation is also part of the course where gilding is a major component. Polychrome sculpture and other painted surfaces on a multitude of objects can be anticipated, along with training in Laser Cleaning.

Chemistry is a necessary part of any training in Conservation not only for understanding the core materials and methodology of conservation but for identifying the materials you are working with. Its applied chemistry and absolutely essential and absolutely fascinating!

Hope this helps!

cropped-header

The author cleaning a portrait of ‘Louis VIII (1755-1824) King of France by François Gérard (1770-1837)


Pigments 18th – 20thC – part 2

We saw in my earlier blog ‘Pigments from the Middle Ages to the Renaissance’ ( Nov 9 2018) just how conservative artists were in their use of materials. Having spent many years acquiring the knowledge and skills of their craft and conscious of the many hours of skilful labour on each work, they were not prepared to risk their time or reputations on experiments with new materials. 

The Renaissance brought change in how artists handled the new material of oil paint; they used the same pigments that had been available since antiquity but in a new paint medium – oil.

From the 17th century onwards another period of expansion and development, the majority of post renaissance pigments were the result of the emergence of modern synthetic chemistry. 

Artists’ represent a tiny proportion of the market for pigments, pigments were made principally for other industries.  Then as now artists adopted pigments developed for industrial use, for example dyes* for the textile industry. There has always been an interval of some years after the introduction of a new artists pigment before it has been widely adopted by artists. 

Many of the new inorganic pigments resulted from the isolation of newly discovered metallic elements and experimentation with their salts; zinc, cobalt, chromium and platinum in the 18th century; cadmium (light yellow to deepest shades of red through to bron) and strontium (lemon yellow) in the 19th century; manganese (black & browns), titanium (white) and molybdenum (blue) in the 20th century. All these metallic salts produce ranges of bright, stable (though not always non toxic) pigments. Other useful pigments were discovered during this period too in experiments with more familiar materials; Prussian blue (Fe) 1704, French Ultramarine (NaSi) 1828;  patent yellow (Pb) 1770’s, Scheele’s green (Cu As) 1778 . 

Early artists’ palette did not have the bright, opaque yellows and greens so essential in landscape painting. The 18th & 19th century colours – Prussian, cobalt and chromium greens along with Emerald and Brunswick green – were welcome additions which together with patent, chrome, platina, lemon and cadmium yellows could provide a riot of greens beyond the wildest dreams of a 17th century painter. Due to toxicity many of these greens were short lived on the artists palette but we do see them in paintings and marvel at the intensity of colour e.g emerald green, a copper arsenic green; brunswick green (1764), a copper chloride green.  

The traditional dependence of artists’ colour-makers (once the apothecary) on the new dyeing trade continued, resulting in a wealth of bright new organic pigments mainly of the lake** type, some of which were less fugitive than the traditional crude plant and animal dyestuffs that they replaced. Among these alizarin (madder) , quercitron (transparent yellow lake) and the early aniline*** hues were less dependable than the Hansa yellows and phthalocyanine blues, which appeared in the later 19th & 20th century. 

It is a measure of artists’ conservatism that medieval pigments still figure large in the modern Colourmens’ lists. However it is also an indication of the improvements in pigment manufacture that many of these are not the original materials but near perfect imitations of their hues concocted to avoid the defects of the old colours. Thus we may now buy non-toxic and non-reacting Naples yellow (Pb) and orpiment (As) or carmine and sepia that are almost light fast. 

** 

* dyes – soluble in water. Pigments are not water soluble; to make a pigment from a dye a complex chemical process known as Lake making is undertaken – see below.

*lake pigments – a dye struck onto a metal substrate, usually aluminium hydrate. The resulting material is an insoluble pigment. 

***aniline hues – this group of synthetic pigments were originally called coal tar colours as they were derived from chemicals from the distillation of coal tar – the result of the gas industry. Made from 5 basic raw materials – benzene, toluene, naphthalene and anthracene. The first pigment of this group is Mauve discovered in the UK by Sir William Perkins in 1856 (making him a millionaire). 

Queen Victoria loved Perkin mauve. 

Perkin Mauve


Elements & their associated pigments

Elements some of their Associated Pigments

Pigments come from many different materials – plants, vegetables, animals and minerals. This list gives an idea of some of the pigments made from mineral elements mined from the earths crust. Bearing in mind that the mining of these elements sometimes involves crude mechanisms and cheap labour there are many social and environmental aspects to what we might perceive as simple paint materials – not least as humans search for other planets. It’s not because we’re going to live there.

Click on the title link above to view the list.

The Repair Shop Christmas Special

The Repair Shop is probably the first programme on TV to reveal some of the ins and outs of the Conservation of Paintings. In the Christmas Special you’ll see me working on a particular type of  painting – a European-style picture from the colonial era of South America. It’s a well known and relevant Christmas subject ‘Virgin and Child’  painted ‘Statue‘ style, imitating statues commonly seen on the Church altar – it is not a realistic figure.

During the 16th century onwards artists from ‘Old World’ Europe sailed into the New World. As well as producing work in the European style, artists taught individuals from indigenous populations to paint in the European style, providing for the rapidly growing market in religious imagery.

This particular painting is remarkable not only because it is in the statue style and tells much ‘news’ from the old world, but in the face of the Madonna we see the face of an indigenous Quechua woman.

The style might be European but she isn’t.

Madonna & Child

Colonial Spanish ‘statue ‘ painting

The designs in the fabric of the Virgin’s mantle are tulips, the mania of which stormed mid 17th century Europe. This religious painting, set in contemporary style, brings news not only of the birth of Christianity but the latest fashion edit from the old world.

Another notable feature of the painting is the artists attempt at creating movement in the image. The caucasian looking angels hold candles whose flames gutter in a breeze (whoosh?) created by a hovering Virgin moving forward towards us, the viewer. If you can imagine looking at the image in a darkened room, lit only by candle, the vision before you takes on a mystical intensity.

There’s more to paintings than meets the eye and these blogs aim to provide incites into  the creative process and the materials and techniques that get us there, as well as inside info on the wonderful world of Conservation.

The other charming event in the Christmas special episode of  ‘The Repair Shop’ was the ‘secret Santa’. We each produced a gift for our secretly selected person. It wasn’t possible in the edit to show all the hand made gifts but at the request of many as to what I made ….. here it is, recipient and all :)))) Happy Christmas everyone!

The Repair Shop, Secret Santa reveal.

Graffiti Painting


Whats Paint Got to do with it?

I wrote in the footnotes of the Nov 2018 blog ‘Medieval and Renaissance Pigments’ that paint is made of two components – pigment and medium.

It led me to revisit my early enthusiasm for paint, paintings and the wondrous developments we humans have gone through to have the materials we use today. 

It’s my great fortune to have trained and worked at close quarters with paintings, to analyse and understand their makeup which lead me to an appreciation of the industrial developments that inform our lives. Incredibly (to my mind) the changes that have taken place in paint from prehistoric cave paintings to right Now, are very small indeed. In fact the paints that early humans made and used (earth pigments, soot, waxes, etc) are still in use today, a legacy to the inherent qualities of these materials.

Paint is ubiquitous. The story of mankind may be encompassed in the development of the material we use in our art and in our everyday lives, whether we’re on the streets of Grimsby or Kathmandu. You might not think of yourself as an artist but you have paint materials around you 24/7, from the road lines along our pavements (see instagrams 14th & 20th Oct 2018) to the faded and scratched paint on shop doors and windows, to the spaces that you find shelter in. It’s everywhere; perhaps you only notice it if it causes a reaction in you – you like the colour or you don’t? its wet paint!?

fullsizeoutput_338d

In brief – many materials can be used as binders for paint – egg, gum, wax, oil and pva are examples you will know. 

Egg tempera painting reached its zenith in 14th century Italy when the Renaissance kicked in bringing the new development of oil paint.  Oil became the most important paint medium for the next 500 years up to the 20th century.

There are four important classes of synthetic resin used in 20th century paint:- nitrocellulose (pyroxylin); alkyds; polyvinyl acetate (pva); acrylic. Acrylic has been the most important synthetic resin used in artists quality paint, the other mediums have been used principally in house paints…….

…..and that’s been the game changer – House Paints. 

For example, Alkyd resins, developed in 1927 (not commercially available until after WWII) are the standard binder in oil based household paints even today. Alkyd ranges are also produced by artists Colourmen – people who make artists paint are called Colourmen

Frank Stella’s (b. 1936) painting ‘Six Mile Bottom’ (1960, Tate) is a commercial, alkyd- based, aluminium paint. Lots of intense, opaque colour, lots of flow and lots of paint needed to make the 3metres x 2 metres (approx) painting.  

As Picasso discovered at the beginning of the 20th century you could do things with household paints that you couldn’t do with paint made specifically for artists or with egg or with wax or casein or anything.

Think Rothko, think Pollock, think BIG!

More on colour, paints, mediums and artists in future blogs.

In the meantime follow me on Instagram for snapshots of all the above.

Instagram:- luciainlondon123

Brief History of Pigments in Western Art – Part 1: Medieval and Renaissance Pigments

One of the questions I’m often asked of my job as Conservator of Paintings is why don’t I retouch with the same pigments the artist used?

There are a number of answers to this but basically, sometimes I do use the same pigment and sometimes I don’t.

An example of where I’m likely to use the same pigments are the earth colours – raw/burnt umber, raw/burnt sienna, yellow ochre etc.

An example – where I do not use the same pigment as the artist is where they have used Lead White. Lead white is found in just about every painting (and household paint!) up until the late 20th century when H&S kicked in. It is fantastic as a paint – it handles well and is extremely durable but, the overriding nature of its toxicity means it is not a viable material for anyone to use if they want to live a healthy, long life. (Titanium white is the 20thC modern alternative).

Over the years I’ve used pigments in my work both as the colour for making the paint* to retouch losses in paintings, and in analysis to understand the original materials artists used.

Let’s begin though, with a brief history of Medieval and Renaissance Pigments.

The Renaissance period bridged the gap between the Middle Ages and the Age of Enlightenment, so roughly 1300-1600. It represents a great theoretical and scientific revolution in Europe.

You would think that such a burgeoning of science and theory and wealth and expansion would affect every aspect of the arts – which it did in one major way and that was oil paint. We’re not talking about that here though, because although the way artists painted did change quite radically with the ‘invention’ of oil painting, the major and most costly component of any paint both then and now is the pigment.

Pigments continued to be manufactured in much the same way as they’d aways been. Artists prepared the extensive range of colours available to them in the manner they always had since antiquity – they got the apprentices to do it. Lumps of raw pigment were washed, cooked, ground, graded, weighed and stored. Apprentices made paint by mixing pigments with egg, wax, mastic, resins and many other mediums – ultimately oil – and laid them ready to use, on the palettes of their masters. (All master artists had once been apprentices so they knew the score).

Medieval artist with apprentice preparing paint

Increased maritime trading* delivered pigments to an increasingly demanding market,  Church and Kings were big business. Artists used the colours in the same old way prescribed over centuries until the Renaissance. The Renaissance caused a shift, driving out the old fashioned, medieval preference for bright, pure, emblematic colours. Artists began mixing.

Using the same range of colours but mixing them allowed for subtlety and more naturalistic effects.  This was really because with an oil medium they could do that which they couldn’t with all the other mediums to date, that is mix colours as they worked, paint bigger and for extended periods of time, working up paint layers instead of being limited to paint mediums drying quickly in small sections.

Oil took a long time to dry allowing artists to literally mix paint, paint over larger areas and even mixing colours on the canvas or panel or whatever support over longer periods of time.

Things got ‘realistic’ and quite often fantastical, which was new and really quite amazing and everyone wanted their portraits painted. Nothing like this would happen again for about 400 years when Picasso popped up – but that’s another medium along with some really amazing pigments and another blog.

Now where were we…….

Ah, yes, technical treatises of the Renaissance such as Lomazzo (Gian Paolo Lomazzo, 1538-1592 Italian painter & writer on art theory and practice – self portrait below) set out comprehensive instructions for the mixing of colours. It was complicated because as artists began to mix colours they had to do it themselves and  became more aware of the issues of incompatibility of certain pigments in certain mediums.

fullsizeoutput_337a

Some pigments mix together less well in one medium than another.  For example a pigment which is ideal for use in oil may well have serious disadvantages if used in fresco techniques e.g lamp black very difficult to use in waterbased paints.  Some pigments if mixed or placed in close juxtaposition will react chemically causing discolouration e.g the blackening of lead white if mixed with sulphur based pigments such as vermilion/cinnabar.

Renaissance artists weren’t so bothered about the stability and permanence of their pigments but more with the visual effects of their painting. However there were a few circumstances where they had to pay close attention as certain combinations of pigments were to be avoided because the negative effects (examples above) happened quite quickly; artists had to pay attention as clients certainly did not want paintings deteriorating before their very eyes.

Technical treatise were a godsend to the artist with a deadline.

By the middle of the 16th century most artists studios weren’t using apprentices to prepare the pigments but sending them out to buy ready prepared pigments from the apothecary – who was no doubt reading Lomazzo too.

Painting got faster, bigger and really dramatic over the next few hundred years.


* & **

* Paint is, very simply, two materials mixed together – a pigment with a medium

                                   (nouns:- medium; vehicle; carrier; binder – ‘s all the same).

In oil painting the medium would be a drying oil such as linseed, poppy or walnut.

In watercolour the medium is gum arabic; in acrylics the medium is…. acrylic etc.

Pigment + medium = Paint

In addition a diluent would be required to enable the paint to continue to flow as it is worked – turpentine for oils, water for watercolours and acrylics etc.


** One of the reasons Venice was such a seismic art/artist hot spot during the Renaissance was due to its geographic position – being the terminal for overland silk routes as well as prosperous maritime trading. Everything landed first in Venice.

The rise of Maritime nations such as the Netherlands inevitably witnessed a decline in importance of Venice as a northern renaissance grew with fortunes of maritime trade and the merchant classes who decided they wanted a bit of the painting action.

Next up:-  Pigments of the 18th-20th Centuries; the rise of Modern Synthetic Chemistry 


BBC2 – ‘The Repair Shop’ – 2018

Late summer 2018 sees The Repair Shop team filming series 4 & 5 for 2019. The show has gone from strength to strength with more experts coming in to the beautiful 18th Century barn at the Weald & Downland Open Air Museum.

The objects selected illustrate a wealth of cultural heritage and the emotional inheritance attached to them. Revelations  can sometimes be spectacular but mainly modest – illustrating how clocks, ceramics, furniture, musical instruments, glass, toys, paintings and all, infuse our private lives with colour and meaning that replays over the years. They are signs of our times, our histories.

Whoever watches the programme cannot fail to reflect on their own life, what they have carried through from childhood or what has been passed down through generations. Memories stirred, reviewed, remembered, reclaimed.

I love the paintings I work on, no job too small, always a privilige. My job is a dream job; it was a real epiphany when I discovered it. I remember clearly the lightbulb moment when I first heard the word ‘Conservation’  – in a pub in Sheffield :)))

I called Sheffield Museum the next day and they told me they had a Conservation Department and I made an appointment to visit.

That was it.

In terms of that is what I was going to do it took a couple more years as I was living & working in New York and then travelling from there overland for a year, I got as far as Bolivia.

I’d already checked out the training courses  in the UK – all 3 of them :))) and its still the same today for a formal training in Paintings Conservation:- University of Northumbria; Courtauld Institute, London; The Hamilton Kerr Institute, Cambridge.

I went to Newcastle – the course was located in a beautiful 19th century mansion in the grounds of Gateshead Technical College in the 80’s.  It was Fantastic! (My Grandmother was from Newcastle, I like to think it was this family link leading me there).

I always have Sheffield Education Authority to thank for providing a grant at that time too.

Moving from Newcastle to London to work at the Victoria & Albert Museum consolidated the foundation for a life in Conservation. I was enthusiastic, fortunate and looking back I have a lot of people to thank for their support and encouragement.

Photos Library

Lucia (at left) working on a painting by Henry Fuseli (1741-1825) in the Paintings Conservation studio, V&A.

The Repair Shop is open for business.  If you have an object with a personal story and would like to take part then contact ‘Ricochet’ who are the Production Company responsible for making the programme they’d love to hear from you!

ProductionEnquiries@ricochet.co.uk